Release management
The Release Management section of the Developers console allows you to manage your app releases. There are two kinds of releases:
- Testing—the release channel for pre-release apps that needs to be tested by users prior to deployment.
- Production—the release channel where you upload qualified and tested versions of your app to the App Store.
Testing channel
The Testing channel provides a place for you to manage pre-release versions of your app for testing purposes. It is divided into sub-channels so that you can manage the different versions that need to be tested. You can create and manage up to 10 test channels.
For more information on managing your testing channels, see Managing a testing channel.
Production channel
The Production channel is used to manage the versions of software that have passed the testing phase and are ready for deployment. This channel is a public facing channel and is the default for users to download your app from the App Store.
- New Release—upload a new app version.
- Public Releases—manage the currently live versions in the channel.
- Release History—manage past app versions.
Each of the tables contains the Version details.

The Version details table contains following columns:
- Version—the app version associated with this version.
- Uploaded—when was this version uploaded.
- Rollout (Only in the active versions table)—the current rollout status of this version. Possible values include:
- Download size—the size of the raw
.exefile for this version. - Installs—how many (non-unique) installations of this version have ever occurred.
- Active Installs—how many active installations exist for this version (the last 30 days).
- Direct download—directly download the app.
When you open a line item from the Version details, you can edit the internal notes or add release notes.
New release pane
The New Release pane is where you upload a new version of your app. Make sure you have a valid .exe file for the new version.
Recommended file size is up to 300 MB, where most apps on the platform are between 100 MB and 200 MB. A smaller .exe downloads and installs faster for your users.
Dragging an .exe file (or pressing Upload and selecting one), creates a new version release called draft.
Once the .exe file has completed the upload, you will see a Release Review screen where you can make adjustments to the release of the app.
- Mandatory version reviews may not be needed once your app is deemed stable after several version reviews. If you don't have mandatory reviews, then you can skip directly to the Release rollout percentage to start your rollout.
- Test Channels are always exempt from mandatory version reviews.
- It is recommended to submit major versions for review, even if reviews are no longer mandatory.
Add internal release notes for this version by pressing Add internal notes. Internal release notes will only be viewable by your app's team, and the Overwolf team.
Once the release notes are added, the screen will change and start the review process for the new version.
Press Submit to send the app for review by the Overwolf team. If at any point, you wish to pull the review back, press Cancel Request.
The release process begins once the version is approved.
Production
Use Add release notes to add public release notes to your approved production version. Then choose how to roll out the version under Release rollout percentage:
- Immediate: enter the rollout % in the textbox and press Start rollout.
- Progressive: roll out the version automatically in phases over a set period. For more information, see Progressive rollout.
For an immediate rollout, press Confirm to release the version from draft mode. It then becomes a full release, and can be found in Public Releases.
At any point throughout the process you can decide to discard this version's draft. To delete the draft version, press Discard release.
Press Confirm to finish deleting the draft version.
Progressive rollout
A progressive rollout releases a new version in phases, on a schedule. You set a total duration and an interval, and the Developers Console raises the version's rollout percentage in even steps until it reaches 100% of your user base. Use it when you want a version to reach more users over time without raising the rollout percentage by hand.
You can start a progressive rollout only on a new version that hasn't started rolling out yet. A version that's already rolling out keeps the manual release rollout percentage controls.
Planning the phases
The phase plan is built from two values:
| Field | Description | Limits |
|---|---|---|
| Total Duration | The rollout period, in hours. | Whole hours, up to 720 (30 days). |
| Interval Duration | The time between two phases, in hours. | Whole hours, at least 1, and no longer than the Total Duration. |
The number of phases is the Total Duration divided by the Interval Duration, rounded down, with a maximum of 10 phases. Each phase adds an even share of your user base, and the last phase is always 100%.
Phase 1 runs as soon as you start the rollout, and each later phase runs one interval after the previous one. The version reaches 100% at the last phase, which runs before the Total Duration ends. For example, the default values (a Total Duration of 24 hours and an Interval Duration of six hours) create four phases:
| Phase | Rollout percentage | Runs |
|---|---|---|
| 1 | 25% | Immediately |
| 2 | 50% | 6 hours after the start |
| 3 | 75% | 12 hours after the start |
| 4 | 100% | 18 hours after the start |
If the Total Duration isn't a multiple of the Interval Duration, the remainder is dropped. For example, a Total Duration of 10 hours with an Interval Duration of three hours creates three phases (33%, 67%, and 100%), and the version reaches 100% six hours after the start.
Starting a progressive rollout
- In the New Release pane, expand the Production step of a version that's ready for release.
- Under Release rollout percentage, select the Progressive tab.
- Enter the Total Duration and the Interval Duration, in hours.
- Check the Estimated phases list. It shows each phase's rollout percentage and when it runs, relative to the start.
- Press Start progressive rollout.
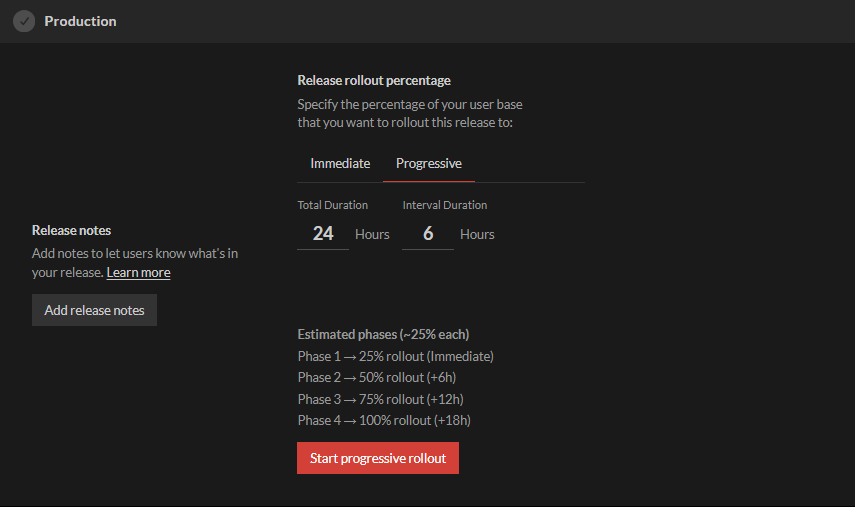
Phase 1 goes live immediately, and the version moves to the Public Releases pane. The remaining phases run automatically on schedule.
If a value is out of range, an error appears under its field and Start progressive rollout stays disabled until you fix it.
Tracking a progressive rollout
In the Public Releases pane, expand the version's row to see its progress.
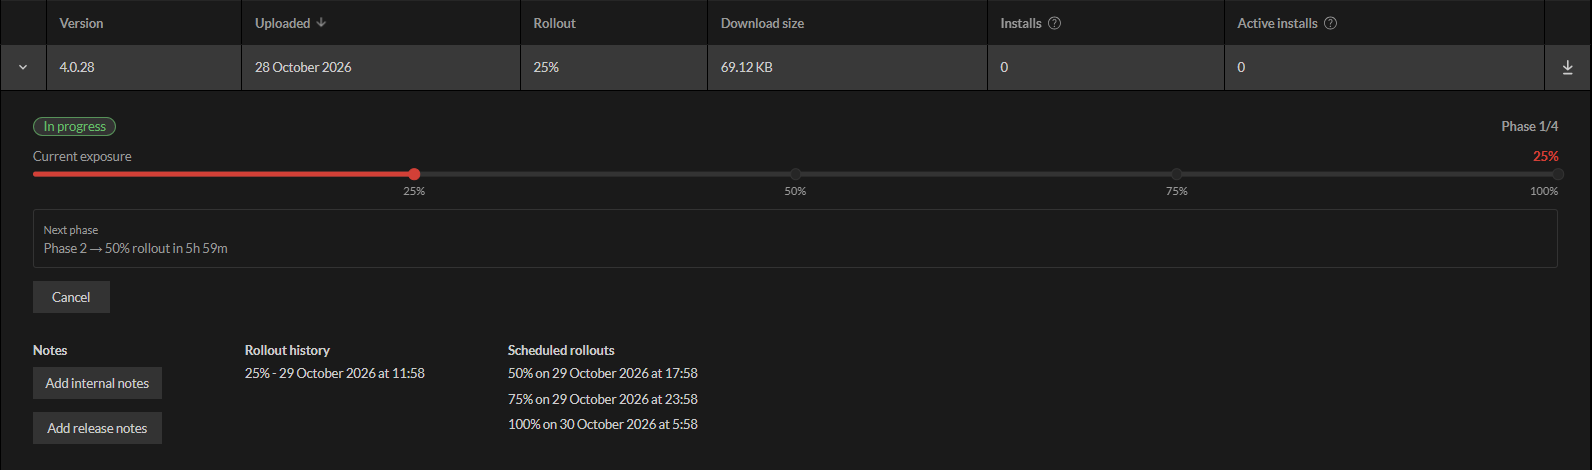
- In progress or Complete: the rollout status. It changes to Complete after the last phase runs.
- Phase: how many phases have run out of the total, for example Phase 1/4.
- Current exposure: the version's current rollout percentage. The progress bar marks each phase.
- Next phase: the next phase, its rollout percentage, and the time left until it runs.
- Rollout history: each rollout percentage the version reached, with the date and time.
- Scheduled rollouts: the phases that haven't run yet, with the date and time each one runs, in your local time zone.
The Rollout column shows the version's current rollout percentage, and Full rollout after the last phase runs.
While a progressive rollout is in progress, the manual Increase and Halt controls are hidden. To stop the rollout, cancel it.
Canceling a progressive rollout
Cancel a progressive rollout to stop the version at its current rollout percentage.
- In the Public Releases pane, expand the version's row.
- Press Cancel.
- In the Cancel scheduled rollout dialog, press Confirm.
Canceling a progressive rollout:
- Cancels every phase that hasn't run yet. Canceled phases don't restart.
- Halts the version at its current rollout percentage. The Rollout column shows Halted, and users who don't have the version yet can't download it. Users who already downloaded it keep it.
- Brings back the manual release rollout percentage controls.

To continue rolling out the version, press Resume to resume at the current rollout percentage, or enter a higher percentage and press Increase. You can't start a new progressive rollout on the same version.
Halting the version with the Overwolf CLI versions halt command also cancels the phases that haven't run yet.
Public Releases pane
The Public Releases pane is where you manage the current active versions.
You can only change the rollout percentage of the latest version of the app.
- Opened
- Closed
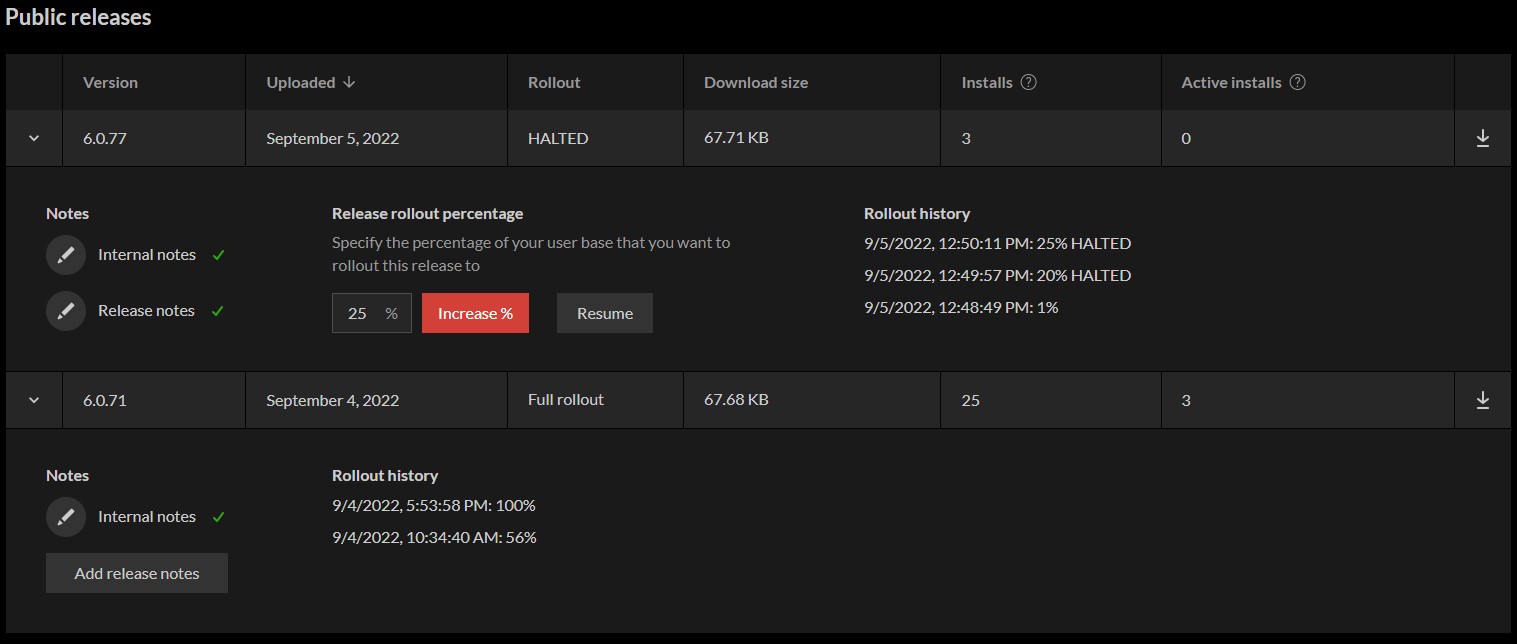
Enter a new number to change the percentage for versions that have not been rolled out completely, then press Increase.

Release rollout percentage
This section only appears for a Phasing version and won't appear for any other version.
It's also hidden while a progressive rollout is in progress. To stop a progressive rollout, see Canceling a progressive rollout.
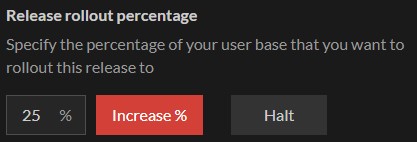
Use this section to edit a Phased version's rollout % as well as to Halt its rollout.
You can halt a rollout even after you have phased it to 99%. Users will no longer be able to download this version. Users who have downloaded the halted version will not be rolled back to the previous version.
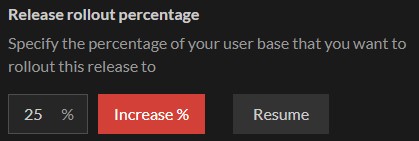
Use this section to edit a Phased version's rollout %, as well as Resume its rollout.
You can resume a rollout even after you have halted it at 100%. Users who haven't downloaded this version yet, will now be able to do so.
Release History pane
The Release History pane is where you manage the previous released versions of your app.
Previous versions are split into pages using The Paging Footer.
- Opened
- Closed
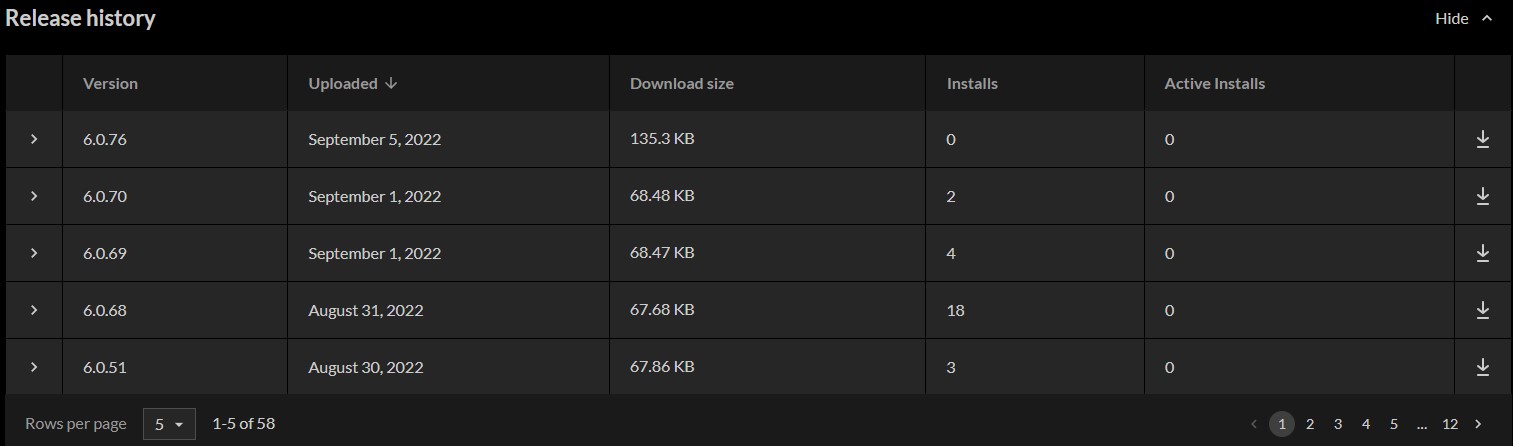
 You can browse the different pages of older releases (in the bottom right) as well as see a total of all versions. You can change the amount displayed per page (in the bottom left).
Release notes
There are two kinds of version release notes:
- Internal release notes—used for documenting all changes done to the app over time. They can only be viewed by your app's staff and the Overwolf team.
- Public release notes—your app's public release notes for documenting public changes to the app. They can be viewed by anyone, even outside of the developer's console. It is recommended to use them to manage your app's public changelog for new versions.
To edit release notes, press on a release in the table, then press the edit buttons. Release notes are edited in the text editor using CommonMark. You can also use the Editing tools in the editor's top toolbar.
Use the Cancel and Save buttons in the editor to discard or save your changes (similar to The Footer Toolbar).
Public release notes also contain toggles:
- Publish—enable the toggle to publish the release notes so that any changes made will be available for everyone to read. Disable the toggle to create a draft for your new version. For release notes you wish to keep internal, use the
Internal release notesinstead. - Important—label this version as
important. Typically used to mark major versions or time-critical updates.
Changes made to the public release notes of an app will take approximately 5 minutes to update. Use the release notes endpoint to verify that they have been updated.
Release notes endpoint
The developer's console exposes a compiled HTML of pubic release notes for every app through the following API endpoint:
`https://console-api.overwolf.com/v1/apps/${app-id}/versions/${version}/release-notes/${page}`
Replace:
app-id—with your app's unique id.version—with the most recent version you wish to display.page—with the changelogs page number. Every page contains up to three changelogs.
The endpoint returns the following json:
{
  "versions": [
    {
      "important": boolean,
      "version": string,
      "html": string,
      "timestamp": number
    }
  ],
  "meta": {
    "perPage": number
  }
}
Any version without a published public changelog will be skipped.
The versions array contains up to three versions.
If it runs out of versions to display before then, it will only be filled by the remaining versions. In the next page after that, it will then be completely empty.
Changelog page numbers start from 1. If you check for page 0, it will just be treated as page 1.
Example Values
For example:
app-id—npijmgiaiiemcnijaljcfddgeihcbifdbhpffiheversion—6.0.71
The link looks like:
`https://console-api.overwolf.com/v1/apps/npijmgiaiiemcnijaljcfddgeihcbifdbhpffihe/versions/6.0.71/release-notes/${page}`
This example includes three versions with release notes.
- Page 0
- Page 1
- Page 2
The result for page 0 would be:
{
   "versions":[
      {
         "important":true,
         "version":"6.0.69",
         "html":"<p>test</p>",
         "timestamp":1662018568162
      },
      {
         "important":true,
         "version":"3.1.5",
         "html":"<figure><img src='http://content.overwolf.com/outplayed/release-notes/069/release-notes-hero.webp'></figure>\n<p><strong>All versions great and small.</strong> This version might be small, but still bright and beautiful.</p>\n<h2 class='new'>New</h2>\n<ul>\n<li><strong>5 new games are now supported</strong> - Rayman Origins, Post Scriptum, South Park: The Stick of Truth, Shadow Tactics: Blades of the Shogun, and Firewatch. Want us to add your favorite game? Let us know on our <a href=\"https://ideas.outplayed.tv/\">Ideas portal</a>.</li>\n<li><strong>Capture mode notification</strong> - An option to turn capture OFF was added. If this option is selected, Outplayed will be disabled for this game, choose wisely (you can always enable it back from the settings).</li>\n</ul>\n<h2 class='improved'>Better</h2>\n<ul>\n<li><strong>Missing backgrounds</strong> - Remnant: From the Ashes and Project Zomboid artwork was added.</li>\n<li><strong>Settings in-game</strong> - Did you know that changing settings while in-game will only take effect after restarting the game? A big yellow alert was added to make sure you know.</li>\n</ul>\n<h2 class='bugs'>Fixed</h2>\n<ul>\n<li><strong>Capture mode notification</strong> - Allow using numeric keypad in the notification hotkeys. We like hotkeys, especially in the winter.</li>\n<li><strong>Video editor</strong> - Videos with aspect ratios different than project settings were stretched to fit. Although stretching is good for your health, we fixed it.</li>\n</ul>\n<p>Have a great idea for Outplayed? Let us know on our <a href=\"https://ideas.outplayed.tv/\">Ideas portal</a>, or talk to us directly on our <a href=\"https://discord.gg/MatrVYK\">Discord server</a>.</p>\n<p><strong>See you in the next version,<br>\nThe Outplayed team</strong></p>",
         "timestamp":1643024580643
      },
      {
         "important":false,
         "version":"3.0.33",
         "html":"<p>3.0.33 release notessssssss</p>",
         "timestamp":1643036589211
      }
   ],
   "meta":{
      "perPage":3
   }
}
Which is the same as the result for page 1.
The result for page 1 would be:
{
   "versions":[
      {
         "important":true,
         "version":"6.0.69",
         "html":"<p>test</p>",
         "timestamp":1662018568162
      },
      {
         "important":true,
         "version":"3.1.5",
         "html":"<figure><img src='http://content.overwolf.com/outplayed/release-notes/069/release-notes-hero.webp'></figure>\n<p><strong>All versions great and small.</strong> This version might be small, but still bright and beautiful.</p>\n<h2 class='new'>New</h2>\n<ul>\n<li><strong>5 new games are now supported</strong> - Rayman Origins, Post Scriptum, South Park: The Stick of Truth, Shadow Tactics: Blades of the Shogun, and Firewatch. Want us to add your favorite game? Let us know on our <a href=\"https://ideas.outplayed.tv/\">Ideas portal</a>.</li>\n<li><strong>Capture mode notification</strong> - An option to turn capture OFF was added. If this option is selected, Outplayed will be disabled for this game, choose wisely (you can always enable it back from the settings).</li>\n</ul>\n<h2 class='improved'>Better</h2>\n<ul>\n<li><strong>Missing backgrounds</strong> - Remnant: From the Ashes and Project Zomboid artwork was added.</li>\n<li><strong>Settings in-game</strong> - Did you know that changing settings while in-game will only take effect after restarting the game? A big yellow alert was added to make sure you know.</li>\n</ul>\n<h2 class='bugs'>Fixed</h2>\n<ul>\n<li><strong>Capture mode notification</strong> - Allow using numeric keypad in the notification hotkeys. We like hotkeys, especially in the winter.</li>\n<li><strong>Video editor</strong> - Videos with aspect ratios different than project settings were stretched to fit. Although stretching is good for your health, we fixed it.</li>\n</ul>\n<p>Have a great idea for Outplayed? Let us know on our <a href=\"https://ideas.outplayed.tv/\">Ideas portal</a>, or talk to us directly on our <a href=\"https://discord.gg/MatrVYK\">Discord server</a>.</p>\n<p><strong>See you in the next version,<br>\nThe Outplayed team</strong></p>",
         "timestamp":1643024580643
      },
      {
         "important":false,
         "version":"3.0.33",
         "html":"<p>3.0.33 release notessssssss</p>",
         "timestamp":1643036589211
      }
   ],
   "meta":{
      "perPage":3
   }
}
Which is the same as the result for page 0.
The result for page 2 would be:
{
   "versions":[

   ],
   "meta":{
      "perPage":3
   }
}
Which is empty, since there are only 3 published release notes from this version.
Setting up Electron auto updates
Electron comes with a built in automatic app updater. In order for Electron to automatically update your app, it must be configured with a consistent endpoint for updates/downloads.
If you are self hosting your app, you will need to provide the CDN link to the autoUpdater.setFeedURL method.
Setting up the updater endpoint for use with Overwolf Developers Console
If you choose to host you app on Overwolf's Developers Console, all you will need to use the auto updater is your_app_id.
Your app ID is part of the URL for your Developers Console. You can find the ID as part of the URL of your Developers Console. (https://console.overwolf.com/#/applications/{your_app_id}/main-dashboard).
Add the following to your main .js file:
const { autoUpdater } = require("electron-updater");

autoUpdater.setFeedURL({
  provider: 'generic',
  url: `https://electron-updates.overwolf.com/electron-updates/electron/${your_app_id}`
});
Setting the update channel
Add a channel field to setFeedURL to pull updates from a specific testing channel instead of the default Production channel. channel must match the name of a channel you created in the Developers Console (for example Dev, QA, or Beta). Leave it unset to use the Production channel.
const { autoUpdater } = require("electron-updater");

autoUpdater.setFeedURL({
  provider: 'generic',
  channel: 'beta',
  url: `https://electron-updates.overwolf.com/electron-updates/electron/${your_app_id}`
});
setFeedURL applies the same channel to every install of your app. You own the logic for which of your users land on which channel, so to give only your beta testers the beta channel, decide this per user in your own code before you request an update, then set the channel explicitly:
const { autoUpdater } = require("electron-updater");

const feedOptions = {
  provider: 'generic',
  url: `https://electron-updates.overwolf.com/electron-updates/electron/${your_app_id}`
};

if (isBetaTester(currentUser)) {
  feedOptions.channel = 'beta';
}

autoUpdater.setFeedURL(feedOptions);
autoUpdater.checkForUpdates();